I am blind or visually impaired: the story in one minute

The build manual

Build it in order.

A few days of work once the parts arrive; the boards and parts usually spend longer in shipping than in your hands. Every step says what you feel, what you hear, and how you check, so no step depends on an image, and each printed part carries a tactile code you can read by touch (planned markings, published with the part files).

The build on video

How to make it

The build on video: the boards, the printed parts, the belt, the collar strip and the ankle bands, from parts to first power on.

Video not here yet. This full length video is being added to the site. Nothing plays here until the real recording is in place.

The open design and its source files

Everything below is published as it is made. The second generation is nearing MVP; costs shown are approximate parts costs.

1

Before you start.

  • Tools: a 3D printer or a print service, small side cutters, and your hands. Hand soldering is optional by design; the connectors are keyed and pre-crimped.
  • Time: a few days of work once everything has arrived.
  • The first print is the fit test coupon, one snap and one key, so your printer proves itself on a coin sized part before printing for hours.

2

Order the boards.

The goal: all surface mount parts assembled at the board house, common parts, one side, so the boards arrive ready to plug.

Coming, not yet published. The board package: the layout, the Gerber files, the parts and placement lists an assembly service needs, and the exact order options table. The schematic exists in the record and the layout is being drawn; the package is published with it. Logged in OPEN-QUESTIONS.md.

3

Order the parts.

The bill of materials, with sourcing status per line. We will publish what a kit costs once testing ends.

4

PETG for the housings and snaps, TPU for what touches skin. Snap arms lie flat on the bed so they bend along the layers, not across them.

Coming, not yet published. The part downloads: 3MF files with settings embedded, STL fallbacks, STEP for modification, and the links to the CAD sources. The OpenSCAD sources exist in the repository and open with the licence; the packaged downloads are published with it. Logged in OPEN-QUESTIONS.md.

Print settings, a starting point: confirm with the fit test

Starting print settings; the fit test coupon confirms them on your printer.
SettingValue
MaterialPETG for housings and snaps, TPU for straps and skin pads
Nozzle0.4 mm
Layer height0.2 mm
Walls3 perimeters minimum, 4 around snaps
Infill30 percent gyroid
SupportsNone. All parts are designed to print without them
OrientationAs saved in the 3MF, snap arms flat on the bed
Clearance in the models0.5 mm on snap engagement faces, 0.3 mm per side on sliding faces

5

Check the fit.

The coupon is one snap and one key. Print it first, every time you change filament.

A good snap closes with one firm click you can hear and feel, holds against a straight pull, and opens again without breaking. A good key slides in one way only and refuses the other three. If the coupon fails, adjust flow or clearance and print it again before any large part.

6

Build the belt.

  1. Step 1

    What you need:
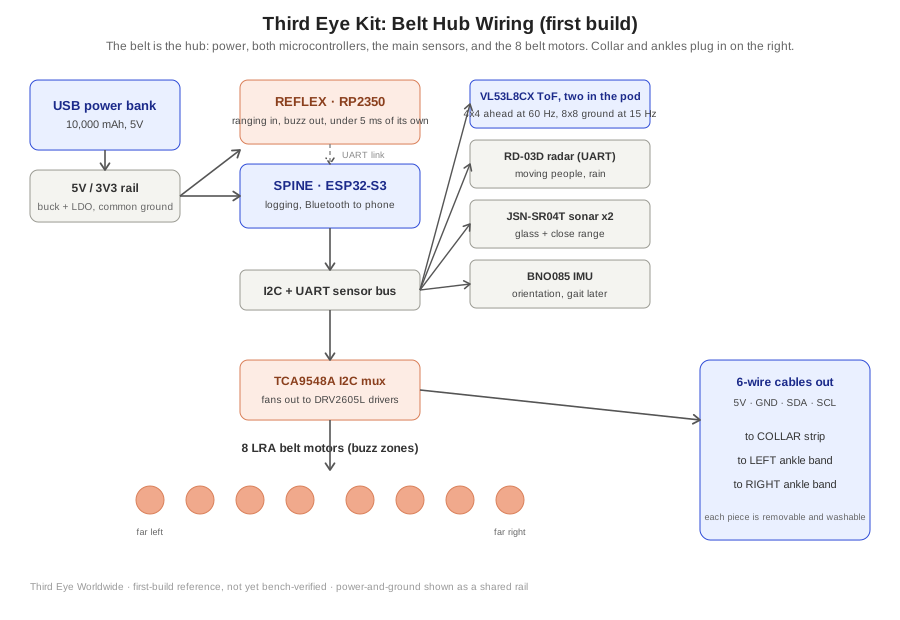
    The belt band, eight motor pods with the tactile code B1 to B8 (planned markings), eight motors on their leads, the belt hub.
    What you do:
    Seat each motor in its pod face, close each pod lid, and clip the pods onto the band in number order, B1 at the left hip going around to B8.
    What you feel:
    Each pod lid closes with one firm snap, and a closed pod has no wiggle. A keyed plug only enters its socket one way; do not force a plug that resists.
    What you hear:
    One clean click per pod lid and a lighter click per plug.
    How you check:
    Run a finger around every pod: no raised edge, no loose lid. Tug each lead gently at the pod wall; nothing moves.
  2. Step 2

    What you need:
    The belt hub, the multiplexer board, the driver pairs, the battery pack with its keyed connector.
    What you do:
    Plug each pod's lead into the hub in order, then the battery last. The battery connector is keyed and cannot be reversed.
    What you feel:
    Every connector clicks home and sits flush. The battery connector needs a firmer push and holds against a gentle pull.
    What you hear:
    A click per connector, and nothing after the battery goes in: the kit stays silent until it is switched on.
    How you check:
    Count the plugs: eight motor leads, the sensor lead, the battery. No socket is empty.

7

Build the collar strip.

  1. Step 1

    What you need:
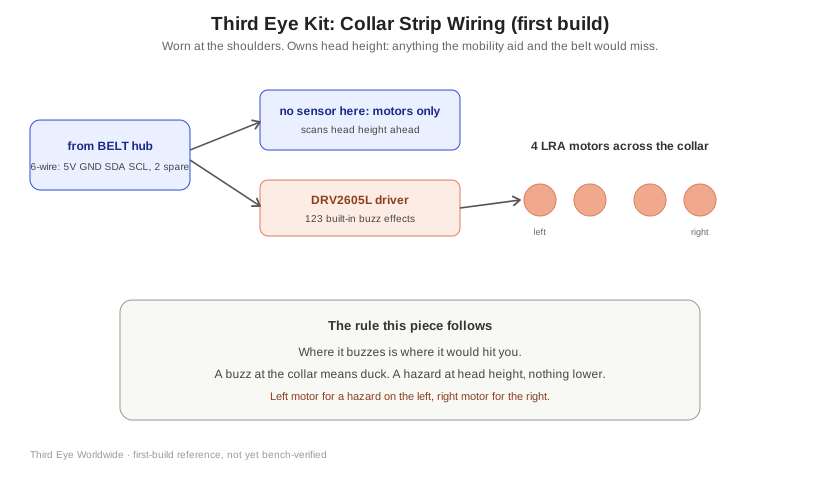
    The collar strip with its four pods, tactile code C1 to C4 (planned markings), and its lead with the magnetic breakaway.
    What you do:
    Seat the four motors, close the pods, and join the collar lead to the belt with the magnetic breakaway; the magnets pull it into place.
    What you feel:
    The breakaway snaps together on its own when close, and comes apart with a straight pull, no tools.
    What you hear:
    A soft magnetic snap.
    How you check:
    Pull the collar lead sideways with light force: it releases cleanly instead of dragging. Rejoin it and feel it seat itself.

8

Build the ankle bands.

  1. Step 1

    What you need:
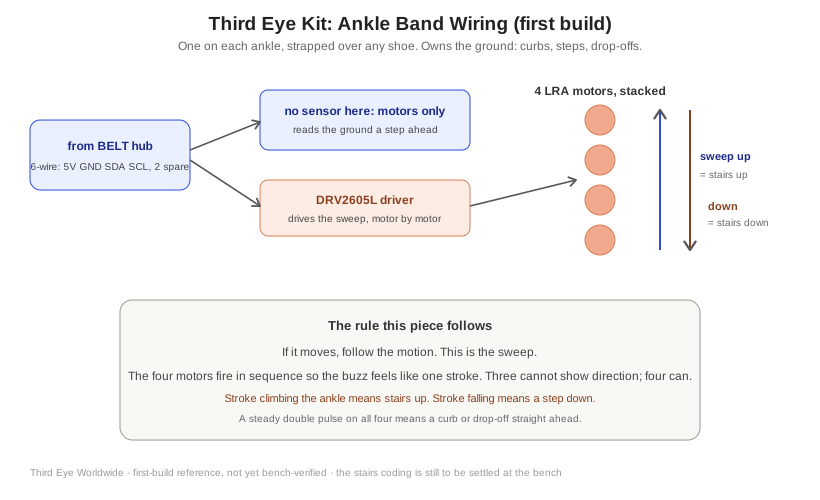
    Two ankle bands, four pods each, tactile codes AL1 to AL4 and AR1 to AR4 (planned markings), their leads with breakaways.
    What you do:
    Build both bands the same way as the collar. The left band's parts carry the AL code, the right the AR code, so touch alone tells them apart.
    What you feel:
    Same snaps, same keyed plugs. The band's closure overlaps by a hand's width of hook and loop.
    What you hear:
    The same clicks and one magnetic snap per band.
    How you check:
    Trace each band's code letters by touch and confirm left is AL, right is AR, before wearing.

9

Connect and power on.

  1. Step 1

    What you need:
    The assembled kit, the battery charged, worn on a table, not on the body, for the first power on.
    What you do:
    Switch the kit on and wait for the self test.
    What you feel:
    Coming, not yet published: the self test pattern is defined with the firmware, which is specified, not written. It will be one clear pattern across every motor, so a missing motor is felt immediately.
    What you hear:
    The faint buzz of each motor in turn.
    How you check:
    Every pod buzzes once during the self test. Any silent pod: reseat its plug and run the test again.

10

First fitting and safety.

  1. Step 1

    What you need:
    The kit, worn over or under a thin layer as the record describes: belt and ankles on skin or a thin base layer, collar over a base layer.
    What you do:
    Fit the belt snug but not tight, the collar so it does not slide, the ankle bands a hand's width above the ankle bone.
    What you feel:
    No pod edge presses in. After ten minutes you forget the weight; what you would notice is heat or chafe, and neither should appear this fast.
    What you hear:
    Nothing. A worn kit at rest is silent.
    How you check:
    Read the safety notice, Using TEK today, before the first walk. The kit is in development: keep traveling the way you travel now.

Using TEK today, the safety notice

11

Report your build.

Your build time goes into the public log, with your consent, and the three day figure stays a target until builders like you confirm it.

Email your build report: the days from first part to first buzz, what slowed you down, and whether we may list you on the supporters wall as a builder.